[WoD] Dream of Cenarius, or: How I Learned to Stop Worrying and Love the Wrath Spam

Since I started raiding in Warlords of Draenor, mana management has been a huge struggle for me.  I seemed to eat through my mana so fast, getting down to 10-20% mana while the other healers on my team were sitting at 60% mana or even more!  Worse, I was at the bottom of the healing meters, almost constantly.

I tried to throttle back my healing, to hold back on casting Regrowths, Rejuvenations, and Wild Growths.  But it was painful, and just made my overall healing even worse than before, even if I had mana available when it was truly needed.

Once we started working on Mythic Black Rock Foundry, I knew something had to change.  I ended up raiding in a Heroic pug one night with another Resto Druid who was doing an insane amount of healing.  Afterwards, I checked his spec and the logs.  Dream of Cenarius accounted for about 8% of his total healing per encounter on average.

Dream of Cenarius causes every Wrath cast, at any time during the encounter, to also send a heal to someone in need.  Heals that are completely mana free since Wrath has no cost.  Of course, these heals are (not-so-)”smart” heals, targeting an injured party member, but perhaps not the player most in need.

Nature’s Vigil, by comparison, only accounted for about 5% of my total healing, and required that I be casting mana-intense spells throughout its duration to receive any benefit.  I know I could be spamming Wrath during Nature’s Vigil, but timing a 30-second Wrath spam session every 1.5 minutes is not an easy task.  In most cases, I was simply using NV on cooldown and casting whatever I normally would (usually expensive heals).

When I had previously experimented with DoC I struggled with needing to change targets constantly.  I do much better in WoW when my targets are located in neat rows and columns, whose locations are fixed and known.  Trying to click on targets moving around me on the screen has never been my forte.  And it was even more challenging because I always had to keep an eye on my raid frame in case someone needed a real heal.  I have accidentally let dps and tanks die because I was too focused on spamming Wrath at a particular target when I should have been watching raid frames.  To put it short, using DoC felt incredibly stressful.

Recently, however, I realized that the damage caused by Wrath was miniscule, practically non-existent, when compared to the damage put out by actual raid DPS.  It didn’t matter which target I was attacking…. the damage I did was pretty much nothing.  While this might disappointing other players, it was a very freeing revelation for me.  I no longer felt as though I needed to burn down the add with the rest of the dps.  I could just stay on the boss, focus on healing and Wrath spam, and my damage wouldn’t really affect the course of the encounter.  Even better, since it didn’t matter who I was hitting, I could use a macro to DPS my target’s current target.  This made spamming Wrath during downtimes easier than ever, while still allowing me to focus on health bars and be ready for incoming damage.

#showtooltip
/cast [target=targettarget,mod:alt][mod:alt]Wrath; [target=mouseover, help][help][target=targettarget, help][target=player] Regrowth

Suddenly, instead of spamming Rejuvenations on the off chance that they might get a tick or two of healing through, I was spamming Wrath and sending free 20k+ direct heals to injured targets!  Since switching to DoC I usually spend the first half or so of an encounter around 80-90% mana, and use Wrath spam during down times later on in an encounter in order to regenerate mana while still maintaining a healing presence.

doc

My healing breakdown from Union’s first Mythic Beastlord Darmac kill.

Dream of Cenarius usually makes up about 7-9% of my total healing done which is a huge chunk of healing completely free of mana costs.  This made such a huge impact on my mana usage that I even swapped out my weapon enchant from Mark of Shadowmoon (spirit) to Mark of Warsong (haste).

It’s still a challenge, sometimes, to spam Wrath when my fingers itch for more targeted healing, but I’m a convert.  I’m not sure how I ever healed without Dream of Cenarius, and I can’t imagine going back to Nature’s Vigil any time soon.

[WoD] Restoration Druid Updates in 6.1

Patch 6.1 goes live on Tuesday!

Here’s my comparison of the 6.1 updates between live and the PTR.  To get the best comparisons, I made sure both my live and PTR toons were wearing the same gear.  However, since I’ve upgraded several pieces on live since copying my toon over, I had to remove a lot of mismatched pieces.  As a result, their matching gear maxed out at ilvl 589, with no weapons or offhand items, and no buffs.  So if the numbers seem low in general, keep in mind they have a low item level for this testing. The difference between the numbers on live and PTR is more important than the amount.

Fix for Wild Mushroom

@WarcraftDevs is tooltip for Glyph’d Wild Mushroom fixed in 6.1? More importantly, is the mana cost for Glyph’d Wild Mushroom fixed?

It is working properly in 6.1, and we’ll investigate the tooltip. Thank you for the heads-up!

This is a pretty big fix!!  Currently, if you use Glyph of Wild Mushroom (which lets you place the Mushroom on a location instead of centered on a player) the cost of Wild Mushroom is also increased by about 2,000 mana.  During a 10 minute encounter, if you cast your Mushroom on cooldown and use the glyph, you will have spent about about 40,000 more mana on Wild Mushroom than if you hadn’t been using the glyph.

The tooltip has already been fixed on the live servers, but the cost is still about 2k more than it should be.  This bug has been stealth fixed in 6.1 (it’s not included in any patch notes!), but after Tuesday we will no longer be unintentionally penalized for using the glyph and we’ll have a pretty significant amount of extra mana throughout a boss fight.

Buff to Force of Nature

Force of Nature’s Treants has been buffed with a 35% increase to their health and spellpower, and an 80% increase to their armor and attack power.

Here are the amounts healed by a single Treant’s Swiftmend and Healing Touch:

LIVE PTR
Swiftmend: 2376 Swiftmend: 3209
Healing Touch: 2377 Healing Touch: 3210

As you can see, this is a a decent buff to our healing Treants, but still probably not enough to get me to use the talent regularly.

Buff to Dream of Cenarius (via Naturalist Buff)

Naturalist (Restoration) now also increases the damage of Druid spells and abilities by 15%.

I am a recent convert to Dream of Cenarius, so when I saw the buff to Naturalist I got pretty excited.  Sure enough, the Naturalist buff also makes healing via DoC stronger, making this talent even more attractive.

LIVE (avg over 6 non-crit hits)
PTR (avg over 6 non-crit hits)
Wrath: 8291
Wrath: 9196
DoC Heal: 12437
DoC Heal: 13793

Other Changes

Talent Changes:

  • Moment of Clarity (Restoration) now lasts 7 seconds (up from 5 seconds).
  • Rampant Growth (Restoration) now also increases the healing of Swiftmend by 20%.
  • Renewal now instantly heals for 30% of max health (up from 22%).
  • Heart of the Wild (Restoration) now increases spell damage by 150% (down from 200%), and Agility in Cat Form by 75% (down from 110%).
  • Displacer Beast is now classified as an Arcane School ability and can no longer be used while silenced.

Spell Changes:

  • Moonfire’s mana cost has been reduced by 55%. (1056 mana to 480 mana)
  • Genesis no longer requires a target.
  • Ironbark is no longer usable while silenced.
  • Nature’s Cure can no longer be cast while in a shapeshift form and is now classified as a Nature School ability.

I don’t have too many thoughts on these changes…  Mostly they just seem like minor balance fixes.  The decreased mana cost of Moonfire is nice, but since it doesn’t contribute to DoC, I rarely cast it.  Slight buffs to Moment of Clarity, Rampant Growth, and Renewal make them more attractive, but I don’t really see myself switching to those talents in most cases.

The fact that Displacer Beast and Nature’s Cure have been added to spell schools means that it is now possible to be locked out of them, if interrupted while casting.  But it is basically just another reason to avoid getting locked out of abilities.

Fun Changes!

Cosmetic transformations that alter the character’s appearance now have a higher priority than Druid combat forms. This means Druids can keep a transformation while shapeshifted.

Many Druid shapeshift forms now have attachment points on the head and back for cosmetic toy effects such as Blazing Wings or Pepe. Additional shapeshift forms may receive attachment points in the future.

I wanted to include a screenshot here of my Druid in cat form using Blazing Wings, but for some reason that toy did not survive the copy to the PTR!  However, I was able to transform into a Druid of the Flame using Leyara’s Locket while shifting into cat form.  These cosmetic changes will be a very nice and fun little quality of life improvement for all Druids.

Overall, 6.1 looks pretty good for Resto Druids.  Buffs to a few spells, fixes for Wild Mushroom, minor balance changes to others, and not really any nerfs.  I can’t wait till Tuesday! =D

[WoD] Talent Choices for Mythic Tectus and Mythic Butcher

I’ve spent more time this raid tier testing out fights in different talent combinations than I think I ever have in the seven years I’ve been raiding World of Warcraft as a Restoration Druid.  Mythic Tectus and Mythic Butcher in particular have required me to choose talents from the level 90 tier that I have basically ignored and have made me re-think the value of Tree of Life.

For reference, this is my typical spec: Displacer Beast, Ysera’s Gift, Typhoon, Soul of the Forest, Mighty Bash or Ursol’s Vortex, Nature’s Vigil, and Germination.

Mythic Tectus

The first problem I had with this fight was the Earthen Pillars.  The spike out of the ground shortly after the tan swirl appears, so you have to move fast…very fast…to avoid being hit.  I probably could have done well enough without it, but I decided to spec into Feline Swiftness, giving me an extra 15% boost to my movement speed.  I still had to react quickly, but I felt as though I had much fewer close calls.  Additionally, our Mages and Moonkin discovered that using Blink/Displacer Beast to kite the Crystalline Barrage away also caused it to travel over the tanks.  They were quickly banned from using it, so I certainly felt no need to keep the talent.

The positioning for our raid team during this encounter felt a bit precarious to me, with the tanks often dancing in and out of healing range, especially during the very beginning when we were standing as far away as possible.  I could occasionally reach one of the melee with Wild Growth that would splash onto the out of range players, but it just wasn’t enough.  So I decided to try Dream of Cenarius, a talent which I have ignored since it was introduced.  Surprisingly, I found it to be very effective!  When the ranged group moved backwards, and I could no longer reach the tanks, I swapped my target to Tectus and started spamming Wrath.  I could see DoC healing the melee and, more importantly, the tanks, even though they were out of range of my normal healing spells.   There wasn’t much opportunity for me to use DoC during the rest of the encounter, but just being able to contribute to tank and melee healing when they were out of range was very helpful for my peace of mind.

I also swapped back and forth between Tree of Life and Soul of the Forest a few times.  At first, it seemed like Tree of Life was useful during the first Upheaval.  However, as our raid learned the encounter, the DPS during the first phase grew stronger and the duration of the first Upheaval became much shorter.  So I specced back into my old favorite, Soul of the Forest.  As we got better at the early parts of the encounter, we started working on the final phase, when we had eight Motes of Tectus up at once.  They would cast Crystalline Barrage all at once, forcing the entire ranged group to run along the wall of mountains to the other side of the room.  Healing at this point was definitely stressful for the raid, even with our Hunters chaining Aspect of the Fox.  Luckily, Druids excel at healing on the run, especially when using Tree of Life!  Once I swapped back into this talent, the damage during the last phase smoothed out as I could now spam Regrowth and keep the raid afloat until the other two healers had a moment to stand still.

Final Talent Choices: Feline Swiftness, Ysera’s Gift, Typhoon (not used during encounter), Tree of Life, Ursol’s Vortex (not used), Dream of Cenarius, and Germination.

Mythic Butcher

With strict DPS timers, it was immediately obvious that I would need to use Heart of the Wild, a talent which (despite having named this blog for) I almost never choose.  Heart of the Wild is a really strong DPS talent for Resto Druids, especially for Butcher.  The raid and tank damage during the first part of the encounter is relatively light, so the other three healers on my team were able to handle it without issue.  I just dropped Wild Mushroom on the ground, and spammed Wrath for the first 45 seconds.  With Heroism, I was typically able to burst around 26-28k DPS for the first 45 seconds of the encounter, doing over 1.5% of the total damage dealt to Butcher.  This may not seem like a lot, but when you finish an encounter seconds after the enrage timer, any scrap of damage can make or break your raid’s success.

After a few attempts,  the healer team could clearly see that we needed some sort of additional healer cooldowns around the 4th Bounding Cleave, so I swapped out Soul of the Forest and picked up Tree of Life.  This time, it was the cheaper Rejuvenations that were most valuable, since mana was tight for all four of the healers and damage continued to be spread through the two groups in melee as Butcher cleaved.

Final Talent Choices: Displacer Beast (not used), Ysera’s Gift, Typhoon (not used), Tree of Life, Ursol’s Vortex (not used), Heart of the Wild,  and Germination.

[WoD] Battle Rezzes and You: What Every Druid, Warlock, Death Knight, Hunter, and RAIDER Should Know — Part 2

Battle rez spells have been highly normalized in Warlords of Draenor, though there are still some slight difference between all four options which every raider should be aware of.  Please read my first post on this topic for an overview of how battle resurrections work in a raid environment.

Death Knight Raise Ally

The Death Knight battle resurrection is an instant cast spell. The downside to Raise Ally is that it costs 30 Runic Power, which often requires a few  seconds of power ramp up time where the Death Knight must be very careful about avoiding abilities that require Runic Power. Using Raise Ally triggers a 10 minute cooldown on the ability when not in a raid encounter.

Death Knights are the only tank class that can cast a battle rez spell without needing to wait for taunt; using Raise Ally will not expose a Death Knight to higher incoming damage like Rebirth would for a Guardian Druid. Raise Ally brings players back to life with 60% health, 20% mana, and a cosmetic 10 minute debuff called Void-Touched which gives the player a ghostly appearance. The Major Glyph of Raise Ally will remove the Runic Power cost, making this free for the Death Knight to cast.

Druid Rebirth

The original battle resurrection spell. Feral and Guardian Druids have a 2 second cast time for Rebirth, while level 100 Restoration and Balance Druids have a Enhanced Rebirth, which makes Rebirth an instant cast spell. When not in a raid encounter, using Rebirth triggers a 10 minute cooldown on the ability. Rebirth will bring a player back to life with 60% health and 20% mana, but this can be modified by the Major Glyph of Rebirth which will cause players to be returned to life with 100% health and 20% mana.

Guardian Druids must be particularly careful about when they use their spell as it will force them out of Bear Form. In most circumstances, Bears should be the last ones called upon to use their battle resurrection. However, with common sense and consideration of encounter mechanics, a Bear can pull this off –just don’t expect an immediate battle rez.

Hunter (Beast Mastery Spec w/ Quillen Pet) Eternal Guardian

This is a very rare battle resurrection spell as Hunters do not always favor the Beast Mastery spec, and when they do, they don’t usually prefer to run with a quillen pet.  Eternal Guardian is an instant cast spell that, when not in a raid encounter, will trigger a 10 minute cooldown on the ability.  This will bring a player back with 60% health and 20% mana.  There are no glyphs that modify Eternal Guardian.

Outside of raid encounters, Eternal Guardian has a unique, and very gimmicky feature: the cooldown is tied to the individual pet.  A Hunter with multiple quillen pets could use Eternal Guardian, then switch to the second quillen and use it again; the first quillen is on a 10 minute cooldown, while the second was not.  A Hunter could even do this while in combat (in a dungeon or world boss or group quest). Note, this will only work in non-raid situations.  During a raid a pet switch would not be necessary as all of the quillens’ Eternal Guardian cooldowns would be the same time as the duration left on the charge timer (see my first post on WoD battle rezzes for more details on battle rez cooldowns during a raid encounter).

Warlock Soulstone

Warlocks have the unique ability to choose someone ahead of time for their Soulstone spell. Before an encounter begins, they can create a Soulstone and place it on another player. That player will receive the Soulstone buff for 15 minutes, during which, if they die, they’ll have the option to use the Soulstone and be resurrected.  The main benefit of using a Soulstone before the encounter begins is that the Warlock does not still have to be alive to have a potentially useful battle rez.  However it can be very difficult to predict ahead of time who might die during any given attempt.

Alternatively, the Warlock can use their Soulstone similarly to a battle rez, waiting until a character has died before using their Soulstone on them. The Warlock should ensure they have a Soulstone ready to go in their bags at the start of an encounter to eliminate cast times.

The spell Create Soulstone takes 3 seconds to cast with a 10 minute cooldown (when not in a raid encounter), and creates a conjured Soulstone. Soulstones are “unique,” meaning a Warlock can only carry one at a time. Using the conjured item is an instant action, and will give the target player a 15 minute buff.  If the Warlock creates another Soulstone after their 10 minutes cooldown has expired, but before the first 15 minute buff expires on the first target player, and casts it on a new player, the old Soulstone buff will be removed on the first target player, superseded by the new cast on the new player.  A Soulstone will resurrect a player with 60% health and 20% mana. This can be modified with the Major Glyph of Soulstone, which increases the amount health restored to 100%.

When using battle resurrection abilities, communication is key. The caster should announce when they are using their battle rez spell, who they are casting it on, and if it has suddenly become unsafe to accept the resurrection. If you are the usual battle rezzer for your raid and you have died, make sure you communicate this to your group so that alternatives can be quickly put into action.

[WoD] Battle Rezzes and You: What Every Druid, Warlock, Death Knight, Hunter, and RAIDER Should Know — Part 1

Battle resurrections went through another big change at the start of Warlords of Draenor.  Instead of being limited to 1 battle rez for a 10 person raid and 3 for a 25 person raid, battle resurrections are now available on a charged based system.  Your raid starts with one available battle rez and then after a few minutes an additional resurrection can be come available.

Battle Rez Charges

For each raid encounter, your team will always start with 1 battle rez, and will gain 1 additional battle rez charge every 90/x minutes, where x is the number of people participating in the encounter.

For example, a 10 person raid will earn a charge every 9 minutes (90/10 = 9).  Since most encounters are less than 10 minutes in duration in LFR, Normal, or Heroic raid, you will probably have only the starting battle rez available to your team.

During a flex encounter with more raiders, such as 15 people, the raid will earn a charge every 6 minutes (90/15 = 6).  It’s feasible that a raid encounter on LFR, Normal, or Heroic mode could last 6 minutes, in which case you would start with a single battle rez, and then after 6 minutes of fighting the raid boss, a second charge will be earned by your team.

During an encounter with 20 raiders, the raid will earn a charge every 4.5 minutes (90/20 = 4.5).  During a 10 minute encounter (something typically seen in high difficulty Mythic raids), the team will earn a total of three battle resurrections through out the duration.

You do not need to use a charge in order to get a second charge.  The timer starts ticking the second an encounter is pulled.  In a 20 person raid, the second battle rez is earned 4.5 minutes into the encounter, the third 9 minutes into the encounter, etc.

A battle rez only counts against the raid’s charges when it has been accepted by the target player.  If the target player declines the battle rez, the raid will NOT lose the charge and the caster’s battle rez will NOT go on cooldown.  If a battle rez is pending on a player (meaning they have neither accepted or declined) the caster’s battle rez will be unavailable until the target accepts, or it will be refunded if the target declines.  This last bit may not seem important, but if you having a pending resurrection and someone potentially more valuable to your raid (i.e. a tank) dies, you have the option to decline the battle rez so that someone else may use it.

The Battle Resurrection Cooldown

The tooltip of a typical battle rez says the spell has a 10 minute cooldown.  This is not the whole picture.  If you are in a dungeon, participating in a group quest, or you are just casting the battle rez on someone while soloing out in the world, your spell will indeed have a 10 minute cooldown.  However…

Raid encounters change everything. For simplicity, I’m going to use a 20 person raid team in these example (meaning the raid will earn a battle rez charge every 4.5 minutes).

All battle rez casters will have their battle rez go on and off cooldown at the same time.  If a Druid casts Rebirth 2 minutes into the fight, the raid will then have 0 battle rez charges remaining and all Warlocks, Druids, Death Knights, and Hunters in the raid will have their battle rez spell go on cooldown.  All caster’s battle rezzes will go on cooldown if another member of the raid team accepts a battle rez and the raid has no additional charges.

If a caster’s battle rez has gone on cooldown, the length of this cooldown is the same as the time remaining until the next charge. In a 20 person raid, the caster’s battle rez cooldown has a maximum of 4.5 minutes.  If a caster rezzes someone 3 minutes into the encounter, the cooldown for every battle rez caster in the raid will be 1.5 minutes long since the team’s second battle rez becomes available at that time.  If a caster uses the first battle rez on someone 5 minutes into the encounter, the raid will have earned a second charge and no one’s battle rez spell will go on cooldown.  If the raid team has additional charges, all battle rez casters will NOT be on cooldown, even the caster.

Effectively, in a 15 minute encounter with 20 raiders, a sole Druid can cast all three Rebirths.  She could cast them once every 4.5 minutes, or, if raiders have died only after 13.5 minutes have elapsed, she could cast all three in quick succession.

No matter how much time is left on a caster’s battle rez cooldown, it will reset at the end of a boss encounter (killing the boss or wiping to the boss).  However, if a battle rez was used on the trash leading up to a raid boss, that specific caster will have to wait for the full 10 minute cooldown before being able to cast it, even if the raid has pulled a boss and the raid has charges available.  In this scenario, other battle rez casters will still be able to use theirs normally.

Tracking the Shared Battle Rez Charges

The best way to manage your raids shared battle rez charges is to use a simple tracking addon.  Personally, I find oRA3 to track encounter battle resurrections very effectively.  The oRA3 addon does a lot of raid leader related things (tracking healer and dps cooldown usage, making it easier to invite many people at once for a raid, etc), but for battle rezzes specifically it puts a timer and a counter on my screen, which tells me at a quick glance how many battle rezzes are currently available in this encounter and how long until the next one will be available.  It also shows who rezzed who throughout the encounter.

Since I’ve been using oRA3 as a general raid addon for years, I haven’t searched out other options for battle rez tracking.  If anyone has a suggestion for a solid, standalone, battle rez tracking addon I’d love to hear about it!

Belkin n52te/Razer Nostromo Gaming Keypad

Back in May of 2009 I was inspired by Phaelia’s post in her (now retired) blog Resto4Life about the Belkin n52 to purchase my own gaming keypad.  Now, over four years later I still use the Belkin n52te keypad and I love it to pieces.  It revolutionized the way I played World of Warcraft, and was definitely one of the best decisions I have made in my gaming career.

When I first began using the Belkin n52te* Phaelia’s post really influences my choice of spell locations and macros.  Overtime, I’ve moved a lot of things around.  I’ve had to make room for our new spells and abilities, re-write macros to accommodate my shapeshifting preferences, and reorganize the movement keybinds.

Lately, I’ve thought it was about time that someone to put together an updated guide for (as it is now called) the Razer Nostromo Gaming Keypad*.  So here is my attempt at it.  Keep in mind the keybinds for the n52te/Nostromo* are highly customizable and I would recommend taking the time to see how a few different configurations work for you, especially regarding the movement keys and “alt” key locations.

*Note: For simplicities sake I’m just going to refer to the gaming pad as “n52te” from here on out.  From all appearances, my three year old n52te and the new Razer Nostromo are the same device.

Contents: n52te/Nostromo Guide

Configuring Your n52te

Character Movement Keybinds

Action Bar Layouts in WoW

Key Binding with Bartender4

Macro Planning and Considerations

My Macros


Configuring Your n52te

The n52te has 14 regular buttons, a scroll wheel button, a round thumb button, a D-Pad, and a large thumb pad.  This is how I have my n52te configured:

n52 setup

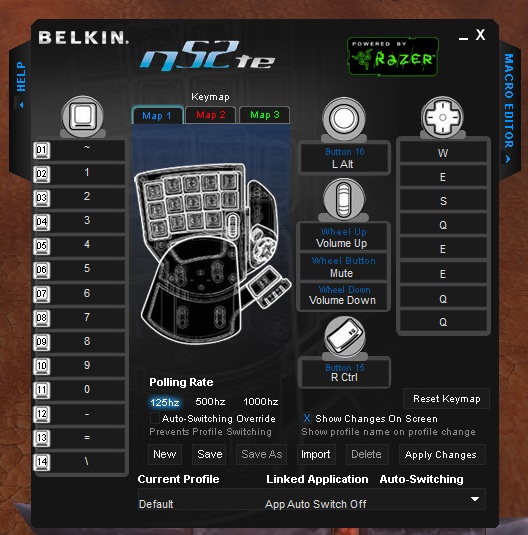
My setup for the n52te.

The very first button is the accent/tilde key, which is just to the left of the 1 on my keyboard.  It was sort of arbitrary when I chose that to be the first key.  Keep in mind that you can configure your keybinds however you like, I would just recommend avoiding keys that are bound to interface functions you use a lot (such as B for your backpack, P for spell book, or J for the guild roster).

I use the smaller round thumb button above the D-Pad as my L-ALT key (for use in macros).  The larger pad below the D-Pad is bound to my R-CTRL key (Push-to-Talk button).  Final item of note, I don’t use the scroll wheel on the n52te as a button, instead it controls my speaker volume.


Character Movement Keybinds
First, a confession:  I don’t know how to use WASD.  I never learned it.  I tried it once or twice, but pretty much failed miserably.   As a result, when I play using a standard keyboard, I cannot strafe or back up.  I could move using only the mouse.  Luckily, in the early days of WoW playing as a healer meant I was usually removed from the action and never needed to actually face my intended targets, so I never really found this to be a problem.

Once I had my n52te up and running, I began using the D-Pad to strafe and walk backwards.  I thought that was pretty neat, and I liked the flexibility of being able to move with my right OR left hand, but it was only after I began learning how to tank that I truly realized just how critical strafing and moving backwards was to World of Warcraft.

I have my n52te D-Pad keybind like this:

  • Analog Down: S (back up)
  • Analog Up: W (move forward)
  • Analog Left: Q (strafe left)
  • Analog Right: E (strafe right)

Sometimes, I end up hitting a corner of the D-Pad, instead of exactly up, down, left, or right, so I keybound all the diagonals to the corresponding strafe key.

  • Analog Down-Left: Q
  • Analog Up-left: Q
  • Analog Down-Right: E
  • Analog Up-Right: E

My center mouse scroll wheel on the right hand serves as my jump button. I can also move forward by holding down both the right and left mouse button and directing movement with the mouse.  In a raiding situation I can only actually turn my character to face one way or another using the mouse, though I can strafe easily with the n52te.  Lastly, I left both the keyboard Left Arrow and Right Arrow keys bound to turning so that I can “keyboard turn” in non-critical situations (such as flying while eating a sandwich).

I’ve found that having movement options on both my right hand mouse and left hand keypad to be very useful in many raiding situations.


Action Bar Layouts in WoW
As Phaelia suggested, my recommended action bar layout is a 3×5 grid of buttons, which mimics the physical layout of the n52te.

The last button on the bottom row, labeled “B5” is button 5 on my mouse. You could instead use this as the scroll wheel button of your n52te, personally I just found that to odd to hit in the middle of combat to be useful for me.

I use Bartender to manage my action bars, but since it has a limit of 12 buttons per bar, I had to use two separate bars to create the 3×5 grid.  The first bar has 10 buttons in two rows, and the second bar has 5 buttons in one row.  Other action bar addons may not have similar limitations, but I would recommend ending up with a 3×5 grid of buttons.

I prefer to put my main abilities in the center row, where my fingers rest.  Lesser used but important abilities find their home in the top bar.  I found the bottom four buttons to be the most difficult to hit, so I use that bar for abilities that should be key bound to the n52te but that are used much less often in a raid.


Key Binding with Bartender4
You may have noticed in the above screenshot that the top left button is NOT keybound to 1.  Instead I use `, which on my keyboard is the key just to the left of the 1.  It’s the accent key, or tilde key.  If I start there and then go across the keyboard, I have 13 buttons (“accent key” through “equal sign”) and then I have my fourteenth key bound to the forward slash.  This configuration made sense to me at the time, but keep in mind that you can bind the n52te to ANY set of keys that you want, and in any order.  It doesn’t really matter, you just want to make sure your keyboard layout matches your n52te profile set up.

A Note on Vehicle Fights

Vehicle fights may cause slight confusion if you use my current configuration.  For example, for me the first ability in a vehicle fight takes the place of the first button on my action bar, the ` accent key, the second ability is the 1 key, the third ability is the 2 key, and so on.  In fights such as Malygos, where I may normally be told to “spam my 1 key” I have to mentally translate that to spamming the top left button, or ` key, because of my unique keybinds set up.

If I had to do it all over again, I would probably start with the 1 key and put the ` key on the bottom row with the \ key, just to alleviate this slight incongruity.  By now, though, I’ve gotten so used to it, that it doesn’t really bother me.  But it’s something I would keep in mind when setting up your own keybindings.


Macro Planning and Considerations
As mentioned above, I use the smaller round thumb button above the D-Pad as my L-ALT key.  This enables me to set up an alternative action for each button on the n52te through the use of macros.  These macros let me use one ability when I hit a key, sch as 5 , and another ability when I hold down the round thumb button (or the alt key) and hit that same 5 key.  In their most basic form, the standard format of my macros look like this:

#showtooltip
/cast [mod:alt] AltAbility; RegularAbility

Since I use my thumb for both the alt key AND D-Pad movement, I prefer to put instant cast abilities in the “RegularAbility” slot and casted abilities in the “AltAbility” slot.  This assumes that my thumb wont be needed to move my character while I’m forced to stand still casting a spell, and that I can use my thumb to move around the room while hitting the instant cast buttons.

With the addition of Symbiosis (with which I usually grab Spiritwalker’s Grace from a Shaman) and some niche encounters (such as Earthrager Ptah in the Cataclysm dungeon Halls of Origination) the inability to use my thumb for both moving and casting has become a little inconvenient.  However, I’ve found that keeping Regrowth (the go to casted heal for Resto Druids) on the 7 key has helped keep my thumb free for quick strafing while still being able to cast strong heals.

In general, I tend to group my healing abilities on each button.

Key       Regular Ability Alt Ability
`    Tree of Life (location relevant shape shift)
1    Nature’s Cure Stampeding Roar
2    Nature Swiftness + Healing Touch    (nothing)
3    Barkskin (myself)
Ironbark (target)
4    Innervate (myself) Innervate (target)
5 Lifebloom Bash
6 Rejuvenation Genesis
7 Regrowth Nourish
8 Wild Growth Entangling Roots
9 Swiftmend Wild Mushroom: Bloom
0 (tab target) (nothing)
Moonfire Wrath
= Symbiosis Nature’s Vigil
\ Tranquility (nothing)
B5 Hurricane Wild Mushroom

Some additional notes regarding the above listing…

Since B5 is one of the side buttons on my mouse, I tend to like using it for abilities that require placement via the targeting circle, such as Hurricane and (glyphed) Wild Mushroom.  Moving the mouse towards the target location immediatly while tapping a button on it to activate an ability targeting circle feels like a smoother action then using a key on my n52te.

I’ve found the 0 key, located on the bottom left corner of my n52te to be very inconvenient to hit with my pinky. Perhaps this is just a case of having small hands.

As for the 2 key and the \ key, I’ve always been hesitant to bundle Tranquility and NS+HT together with other abilities in a macro.  I have this nagging fear that I would hit them accidentally and waste powerful healing cooldowns.

However, as the number of abilities in the Resto Druid toolkit has expanded, and the cooldowns for both Nature’s Swiftness and Traquility have been majorly reduced, I’ve begun to feel the need to explore better uses for these four essentially empty button slots.


My Macros
Please check out the links below for the specific macro configurations for Leiyan.

Restoration and Balance Spec Macros

Gemming Your Resto/Feral Druid, PSA

When you decide to play a Resto Druid and offspec into Feral (instead of Balance like a normal Resto Druid does), make certain you keep an eye on your gems.  And in case there was any confusion on the issue…

Gemming your amazing new gloves with Delicate Inferno Rubies will not, in fact, help you heal better.  Not that I have -any- personal experience with this matter whatsoever.  *wanders off mumbling about speed gemming during raid breaks*

[4.3] 7/8 Dragon Soul

The newest raid content in World of Warcraft has been sort of a roller coaster of experiences for my guild.  In our very first night, on patch 4.3 launch day, we took out Morchock, Zon’ozz, and Yor’sahj.  The boss kills flew by so quickly that in our haste we forgot to take screenshots!!

100% Accurate Morchock Screenshot Reproduction

The next night Hagara and Ultraxion fell before us (we finally remembered an official screenshot for Ultraxion!), and Warmaster Blackhorn died on Sunday.  Our first week of Dragon Soul was over and we were already 6/8 normal modes. It felt kind of surreal.  Almost finished with an entire new raid tier before the first week.

After clearing out Spine of Deathwing on the 11th, we’ve been working on the Madness of Deathwing for the last week.  Part of me feels like we should have had this encounter in the bag by now; he should have died by the 18th, at the very latest.   Another part of me is a little glad we didn’t just blow through the whole instance like tissue.  Well, that second part is a very small part.

We’ve been experimenting with a variety of raid compositions (2 tanks, 3 healers, 5 dps vs. 1 tank, 2 healers, 7 dps) and different platform orders (“green, yellow, red, blue” vs. “green, yellow, blue, red” vs. “green, red, yellow, blue”), and just haven’t found the right combination of everything for it all fall into place.  We’ve seen phase 2 a couple of times thus far though, so things are looking up.

So far this week, we cleared the first seven bosses completely in one night with minimal fuss, so we’ll have all day Thursday to (hopefully) finish off Madness of Deathwing.  Getting him out of the way before we take a week off for Christmas and New Years would be a relief.

[4.3] Transmogrification! Tsuki ni Kawatte Oshioki yo!

The only thing I could think about on Tuesday, Patch 4.3 Day, was TRANSMOGRIFICATION.  I know the blogosphere has lit up all over this topic, but I just can’t help adding my own two cents.

Being sentimental by nature I was well positioned for the initial announcement of Transmogrification, and had near complete sets of all tier gear from t4 to t12.  Despite that I spent a lot of time wavering between my favorite tier sets and coming up with an original look.  However no matter what I ended up with, one thing was always certain: the T8 Conqueror’s Nightsong Sailormoon Headpiece will pretty much be a permanent fixture on Leiyan’s head (as featured in my blog banner!).

Sailormoon hat image borrowed from Wowhead!

Sailormoon hat image borrowed from Wowhead!

This hat is the single most amazing piece of gear ever created by Blizzard… and now I will get to wear it forever.  To make my life even more amazing, Blizzard introduced new hairstyles for Night Elves back in patch 4.2 including “Sassy Buns” which looks pretty much exactly like Sailormoon’s hair does, except much much shorter. Still, the odango atama are intact and wearing it in white with the T8 hat is nearly the perfect combination.

Honestly, you have no idea how happy this makes me.

In addition to the Hat of Amazing Awesomness, I’ve decided on a custom look pulled from green quality gear for my debut transmogrification set.  The foundation of this set comes from the Archer’s set of gear.  However, I changed out the shoulders and boots for the Umbrafen set, the cloak (hidden in this image) from the Tracker set, and the belt from the Ranger set.  I completed the outfit with the Cenarion Expedition Tabard and Staff of the Verdent Circle, which set the entire look off nicely.  The Staff of the Verdent Circle is actually a really unique and interesting item, since it has animation effects that grow flowers and mushrooms along it’s length.

Overall, my goal for this look was of a Druid, blessed of Elune, in practical clothing, actively involved in the daily business of saving Azeroth.  She is out in the field, doing meaningful work, and has a no-nonsense attitude about her outfit.  I think I achieved that look quite nicely, and I am very pleased with the outcome.

[4.2] Firelands 10s – Resto Druid Tips for Heroic Beth’tilac

My guild took out Heroic Beth’tilac on Tuesday night!  Certainly an exciting moment, especially since it was only our second night on the boss and we had assumed we would still be wiping on her well into Thursday.  I had the privilege of playing a special role for the boss fight; the Broodling soaker (which was a ton of fun!!).

A couple of months ago I wrote a start guide/summary for normal mode Beth’tilac, which you can find here.  For the most part the Heroic version of the encounter is very similar (damage dealt and health pools are bumped up as would be expected) but there are two main encounter changes.

  1. The Drones will Fixate on a raid member.  That raid member essentially “tanks” the Drone, although it will do 75% less damage than normal so it hits like a wet noodle.
  2. Four Broodlings spawn with each wave of Spiderlings.  Upon contact with a raid member, the Broodling will explode and leave behind a pool of orange goo which will both do damage over time and slow anyone standing in them. A “soaker” must get to them before they get to the raid to keep the goo explosions away from the group as much as possible.

For the most part these two changes are independent of each other, but if your Broodling soaker is also fixated by a Drone, they must move away to avoid letting the Drones eat Spiderlings.  During this time, someone else needs to temporarily take over Broodling soaking.

There are plenty of general guides and strats for this encounter, but what I really wanted to touch on are some Resto Druid Tips & Tricks for taking on the “soaker” role that I discovered while learning this encounter.

Why Choose a Resto Druid as the Broodling Soaker?

I believe some groups opt to put a strong AoE DPSer in charge of the Broodling, but we found that our DPSer had trouble focusing on both their AoE damage rotation and making certain they were positioned properly to intercept the Broodling.  Additionally, healing on this DPSer was fairly intense because of the Volatile Bursts and general damage from the encounter.

Instead, we decided to switch things around, and have a healer act as the soaker, since they could just heal themselves up.  It was a risk to try, but it paid off for my group.  We found that Resto Druids are a great choice for the Broodling Soaker because of our mobility.  We can shift into Travel Form for a quick run across the room to the next Spiderling/Broodling spawn point (and don’t forget about Dash if you are desperate!), and our instant-cast HoT heals are fantastic for healing on the move.

Get your PvP-like Spec on!

After a couple of shots at being the soaker in my normal PvE spec, I decided to go with this specialized talent spec set up in order to pick up some extra survivability:

I’m sure once we have Beth’tilac on farm, I’ll be fine preforming as the Broodling Soaker in my normal healing spec, but the specific tweaking I did for my Heroic Beth’tilac spec seemed to help me out a lot.  The only thing I would change for next time is taking the point out of Nature’s Cure (no magic debuffs in the encounter) and putting it into Genesis for stronger HoTs and Swiftmends.

I choose talents that would reduce damage taken and increase my overall survivability.  Here are some of the highlights regarding my choices.

Perseverance
This was a fairly obvious choice as the Broodling Volatile Bursts and the orange goo they leave behind both cause magical damage.  Anything I could do to reduce the damage I took was really important when deciding on my new spec for this encounter.

Nature’s Ward
Since a single Broodling explosion had the potential to take me down to under 50% health (explosion coupled with being accidentally stuck in the goo), having a free Rejuvenation for the HoT and to use as Swiftmend fodder was incredibly valuable.

Empowered Touch
This is a somewhat controversial choice for me, but I believe the right one.  After a couple of attempts with Empowered Touch still in my spec, I found that I was somewhat limited in my ability to heal myself with direct heals.  I was often stuck needing around two direct casts to prop myself up enough for the next Spiderling attack, but time enough to only cast one spell.  Whenever I cast a quick Nourish or Regrowth on myself, it would delay Lifebloom’s bloom when in reality I would have benefited more from a bloom as soon as possible.  So, I removed this talent from my spec in order to force my Lifeblooms into blooming.  Allowing Lifebloom to bloom helped give me the extra burst healing I needed to stay topped off, and I never had to worry about delaying a large self cast in order to get the bloom.   The only downside is that I had to recast or refresh the three-stack on myself fairly often, but this was quite manageable during all of the running around.

Moonglow & Genesis
In order to pick up all those survivability and self-healing talents, I had to sacrifice points elsewhere so Moonglow and Genesis ended up on the chopping block.  On the upside, mana regeneration was not an issue for me at all throughout the entirety of phase one.  I started the second phase hovering around 90% mana with a still unused Innervate.  The extra healing from Genesis, while nice, didn’t seem that critical.  However, as already mentioned, I plan to move one point into that talent in subsequent attempts.

Graphic Settings

My group assigned a Hunter to kill the Spiderlings, and in order to kill them fast enough he had to put Frost Traps in their path to slow them down.  Unfortunately, despite high graphics settings, the Frost Traps would sometimes hide the locations of the orange puddles.  When I’m trying to skirt the goo as much as possible to keep the puddles placed closely together, this was a huge problem.

Through some trial and error we discovered that, in fact, my graphics were tuned too high, and that I needed to turn Projected Textures off in order to see the orange goo puddles properly while Frost Traps were in effect.  In fact, once I disabled Projected Textures, I couldn’t see the locations of the Frost Traps at all.  This also has the side effect of turned off the pretty green runic design of Efflorescence, so it took me a few seconds to get used to seeing my healing circle as just a circle of flowers.  I don’t think I could have successfully handled the Broodlings while Frost Traps were visible on the ground and covering the orange goo puddles.

How to Soak the Volatile Bursts

Four Broodlings will spawn, one at a time, from the same location as the Spiderlings.  Having never really paid attention to the Spiderling spawns before as a healer, I asked our Raid Lead to put up markers near the spawn locations so I knew where to look (later on, we also found these helpful for calling out where to run to next).  As it turns out, a small dust cloud forms where the Spiderlings are about to spawn as a warning.

The Broodlings are the bright orange colored spiders, pretty easy to pick out once you know what to look for (the regular Spiderlings are red colored).   They appear one at time, choose raid member to fixate on, and run straight for their target.  Your job as a soaker is to run through the Broodling and cause it to explore before it gets to its target (and the raid).

Generally, I started as close to the spawn location as I could, hitting the first one and strafing out of the orange goo.  Then I would move before that patch and get ready to intercept the next one.  If the raid is doing their job of staying fairly grouped up in the center, the Broodlings should all follow about the same path. The Broodlings move pretty fast… but you can keep up with them and even over take them a little by shifting into Travel Form –that is assuming you didn’t accidentally get too close to an orange puddle.

The key to exploding the Broodlings as safely as possible to be running -through- the spiders when you explode them.  Position yourself and strafe through them as they come by, then keep moving to avoid the puddles.  If you do it right, you wont be slowed by the goo at all.  Even if your a little slow, being already on the move will help prevent you from taking more than one or two ticks.  Of course, it takes some practice to get this right.  Sometimes I ended up strafing right in front of, or behind, the Broodling, missing the explosion completely (and typically wiping the raid…oops!).

As soon as the fourth Broodling explodes I started turning my camera around to scan the next two locations, and panning back to the near spawn point as well.  Sometimes we would have up to four waves of Broodlings spawn from the same location.  Generally, the first puddle of goo would dissipate just before the first Broodling appeared, allowing me to use essentially the same explosion locations.

If the next Broodling spawn point was at the far opposite location, I used Travel Form to get there as quickly as possible, usually getting the first Broodling more towards the center of the room, and then moving up to get the second Broodling as close to the spawn point as I could. Lastly, if the Broodling fixated on me, I usually tried to kite it away to the side a bit, rather than lining it up with the rest, just to get a bit more breathing space.

Essentially, I had to be on my toes for each wave of Broodlings, casting Regrowth or Nourish on myself if I got into intercept position early enough and keeping Lifebloom and Rejuvenation on me when I was on the move, especially when I was running between spawn locations.

The DPS assigned to kill the Spiderlings will also need a bit of healer attention, as he was often running out of the range of the healer in the center.  I found that a Rejuvenation, Wild Growth, and occasional direct cast was usually enough to help him stay alive, and I’m certain the ground level healer was also tossing him heals whenever we ran through the center between Spiderling spawns.

The last, and most important, point I want to make is regarding the Drones.  As mentioned briefly above, the Drones can and probably will Fixate on you at some point in the encounter.  As the soaker your job is to be near the Spiderlings…which is exactly where you don’t want the Drone to go.  As soon as I noticed that I was Fixated, I called out for back up soaking and ran away, towards the center of the room. The back up would declare his or her intention to move in, and start catching Broodlings as best as possible.  Once the Drone died or picked another target, I went back to the soaking job, making sure to heal up whomever had taken the hit in my place.

And…I think that’s about it!  Thanks for reading my ramble on Heroic Beth’tilac, and if your working as a Broodling soaker for your group, I hope these tips have been helpful!